5 Essential Steps to Take When Suffering a Dental Trauma
Accidental falls, sports injuries, or unexpected impacts can lead to dental trauma. In such emergencies, every second counts. Following a set of well-researched guidelines can dramatically improve the chances of saving a damaged or dislodged tooth. In this comprehensive post, we detail the 5 essential steps you should take when encountering dental trauma, based on recommendations from the International Association of Dental Traumatology (IADT) and other reputable sources.
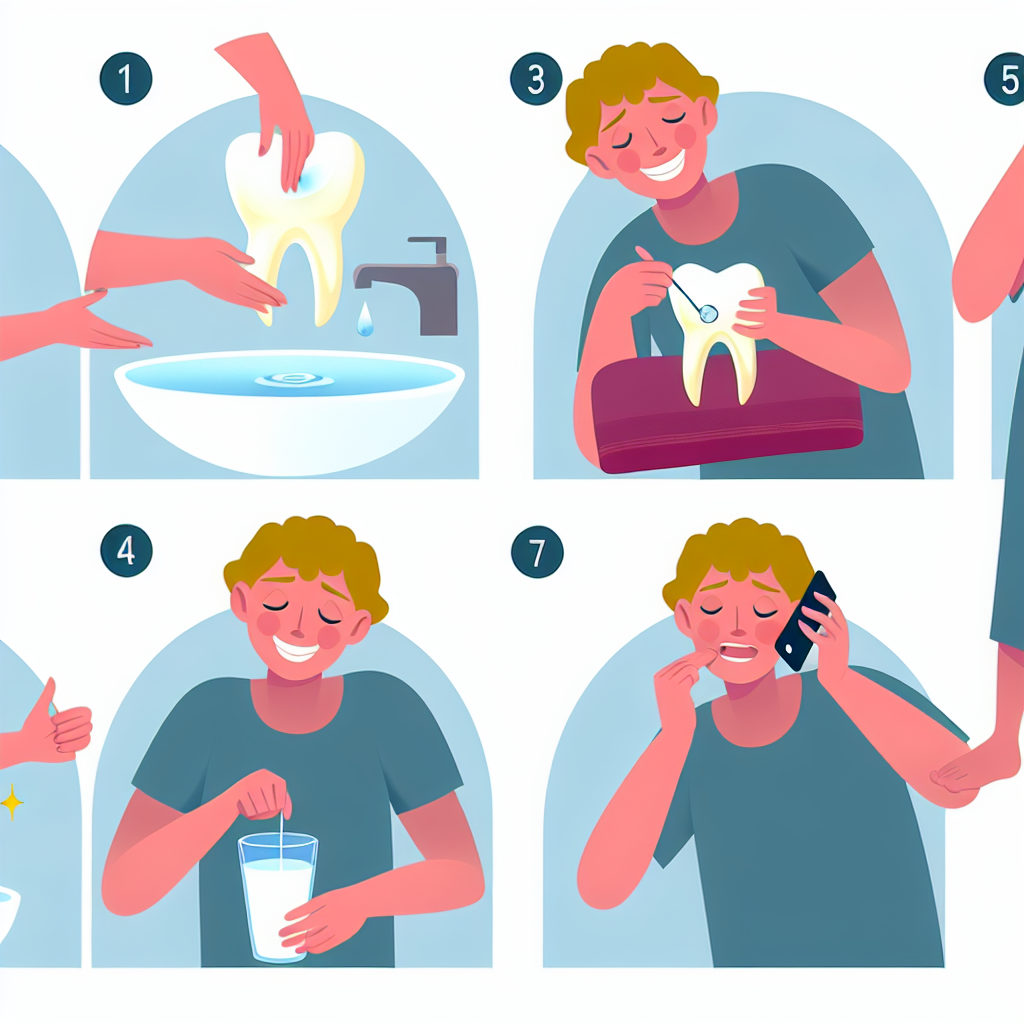
Step 1: Handle the Tooth Carefully
The first, and perhaps most critical, step in the event of a dental trauma is to handle any displaced or broken tooth with extreme care. Avoid touching the root of the tooth, as it is highly susceptible to damage. Instead, grip the tooth by its crown—the part that is normally visible in the mouth. Mishandling the tooth can lead to contamination or further physical injury to the periodontal ligament, which is crucial for the successful reattachment of the tooth.
According to dental trauma guidelines, any direct contact with the root may compromise the viability of the tooth. For example, the American Academy of Pediatric Dentistry (AAPD) and the guidelines provided by IADT emphasize maintaining the integrity of the tooth surfaces while minimizing trauma during handling. Always rinse your hands prior to handling the injured tooth if possible, and use a clean cloth or tissue as an added precaution.
Step 2: Gently Rinse the Tooth
If the tooth has been disrupted from its normal positioning, it is imperative to gently rinse it. However, care must be taken not to scrub or aggressively clean the tooth. Rinsing should be done lightly by placing the tooth under a stream of lukewarm water for a few seconds to wash off any dirt or debris. Do not use soap or chemicals in this process. The goal is to ensure that the tooth is free of contaminants while avoiding any damage to the periodontal ligament fibers.
Expert sources like Irvine Endodontics and Raleigh Endodontics highlight that the cleaning should be gentle. Any aggressive cleaning might dislodge cells necessary for healing or further damage the site of injury. Using lukewarm water helps in preventing shock to the tooth’s delicate tissues.
Step 3: Reinsert or Preserve the Tooth
A key decision at this point is whether the tooth is suitable for immediate reimplantation or whether it should be preserved for transport to a dental professional. If the injured tooth is a permanent one and the conditions are favorable, the recommended action is to carefully reinsert it into its socket. However, this reimplantation should only be attempted if you are sure that the conditions are optimal and there is minimal risk of further damage to the tooth or surrounding tissues.
If reimplantation is not possible, the tooth must be stored in a suitable medium to keep it viable until professional treatment can be obtained. Milk is widely recommended because of its balanced pH and osmolality that help preserve the periodontal ligament cells. Alternatively, if milk is not available, maintaining the tooth in your saliva by placing it inside your cheek can be a temporary measure (especially for children), but only if there are no other complicating factors like a cut in the mouth.
For additional details, check resources from the IADT-ASD guidelines and related research available on PubMed. They outline that either reimplantation or appropriate storage can be critical for the tooth’s survival after an emergency.
Step 4: Apply a Cold Compress
Following the management of the tooth, it is vital to control swelling and manage pain, which are common after dental trauma. One of the simplest yet effective methods is to apply a cold compress to the affected area on the face. The cold helps reduce blood flow to the area, thereby minimizing swelling and providing relief from pain. It can also help to hypothermically preserve any injured soft tissues.
When using a cold compress, it is important to always wrap it in a cloth or a thin towel to avoid direct contact with the skin, which can cause frostbite or additional irritation. A compress should be applied for about 15 to 20 minutes at a time, with intervals between sessions to allow the skin to recover. Repeated applications in the first few hours post-trauma are often recommended by dental trauma guidelines to manage inflammation effectively.
Step 5: Contact Your Dentist Immediately
After taking the initial steps for handling and preserving the injured tooth, the next most critical action is to seek professional dental care immediately. Timing is of the essence in dental trauma cases; prompt treatment within the first hour can significantly improve the likelihood of saving the tooth. This period is often referred to as the ‘golden hour’ in dental trauma management.
Even if you feel that the tooth is stable or that no further damage is apparent, an examination by a dental professional is essential. Dentists are trained to assess the extent of the injury, monitor for any possible complications (such as infection or damage to the surrounding bone and tissue), and provide the necessary interventions. The sooner professional care is administered, the better the prognosis for successful reimplantation and recovery.
Additional Considerations: Prevention and Preparedness
While the focus of this post is on what to do in the event of dental trauma, it is equally important to consider preventive measures. Many dental trauma cases could be mitigated by the use of protective gear during high-risk activities, especially in sports. Mouthguards, for instance, are an effective barrier against dental injury during contact sports. Additionally, awareness of proper safety measures can contribute to a significant reduction in the incidence and severity of dental injuries.
Taking preemptive steps by educating yourself and your loved ones about dental first aid can make a substantial difference. Learning proper techniques for responding to dental trauma not only prepares you for emergencies but also relieves anxiety when a dental emergency does occur.
Conclusion
Dental trauma can be a distressing experience, but immediate and appropriate action greatly improves the chances of recovery. Let’s recap the 5 essential steps:
- Handle the tooth carefully: Always touch by the crown and avoid contact with the root.
- Gently rinse the tooth: Clean the tooth with lukewarm water without scrubbing.
- Reinsert or preserve the tooth: If possible, reinsert immediately, or store the tooth in milk/saliva.
- Apply a cold compress: Reduce swelling and control pain by using a cold compress appropriately.
- Contact your dentist immediately: Time is crucial, and prompt professional care is necessary for the best outcome.
Following these steps, as reinforced by guidelines from esteemed sources such as the American Academy of Pediatric Dentistry, Irvine Endodontics, and the IADT-ASD guidelines, will help ensure that you are as prepared as possible when a dental trauma event occurs.
If you find this guide helpful, please share it with those who might benefit from knowing how to respond effectively in a dental emergency. Remember, prompt action coupled with professional dental care can mean the difference between saving or losing a tooth.
References
- AAPD Guidelines for the Management of Traumatic Dental Injuries
- Irvine Endodontics – First Aid for Dental Trauma
- IADT-ASD Guidelines
- Relevant Study on Dental Trauma (PubMed)
- Raleigh Endodontics – Immediate Care Tips
Always consult your dentist or a healthcare professional in an emergency for personalized advice.